Model Information


Description
Basics:
You MUST update ComfyUI from Update folder (using both .bat files)
Then, open ComfyUI and Load the .json to open the workflow.
You will need Node Manager and use it to install some custom nodes.
https://github.com/ltdrdata/ComfyUI-Manager
NOTE: The Prompt box has 2 boxes. Do NOT prompt into the clip_1 box, it follows prompts poorly and gives weird results.
GREEN Nodes: In these nodes you can freely change numbers to get what you want.
RED Nodes: These are my recommended settings. Feel free to experiment, though.
=================================================
High-Res fix 1.3 LITE (100% Flux based)
Basically, this workflow works in 2 stages:
text2img: Here I added a node that allows you to select Flux safe resolutions by clicking the dimensions button in the Green Node.
img2img: This regenerates the image at a higher resolution, the Green Node is where you select the upscaling factor, similar to A1111.
Version 1.1: Added a preview for each stage of the process.
Version 1.2: Added the dedicated Flux node for prompting. It includes the Guidance scale, but only use the T5XXL box (the lower one).
Version 1.3: Removed the secondary upscaling. It was added as a separate workflow.
Version 1.4: Added Wildcards and LORAs support.
=================================================
High-Res fix 1.5 FULL (100% Flux based, with Wildcards and Loras support)
This was renamed from High-Res fix 1.1 Wildcards and updated!
This has everything High-Res fix 1.3 has, plus Wildcards and LORAs support.
NOTE: You need to place your wildcards in:
\ComfyUI\custom_nodes\ComfyUI-Impact-Pack\wildcards
you can place them in subfolders.
Make sure you either re-launch or refresh after adding any Wildcard.
The wildcard now follows prompts much better!
Do NOT prompt into the clip_1 box, it follows prompts poorly and gives weird results.
WILDCARD NODE:
Populate mode allows you to prompt into the upper box with Wildcards.
Fixed mode allows you to prompt in the lower box without Wildcards.
LORAs:
\ComfyUI\models\loras
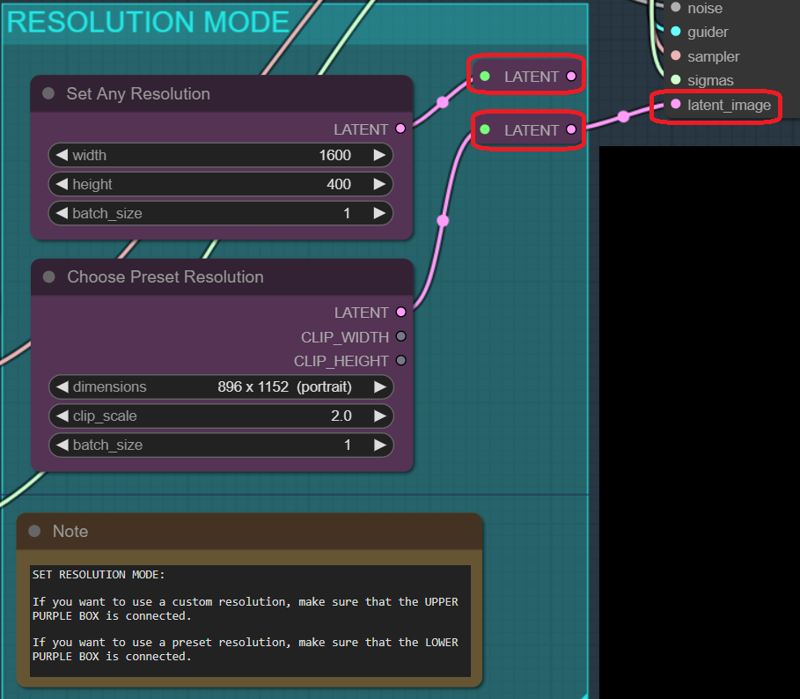
Resolution Chooser:
Now you can choose how to input the resolution:
Just connect the box you want (only one at a time!) to latent_image
=================================================
text2img FULL (with Wildcards and Loras support)
text2img with Wildcards and LORA support. This one has no High-Res fix.
Now includes Resolution Chooser (see the high res version above for explanations).
=================================================
Upscaling modeled after the EXTRA Tab in A1111 system.
Upscaling: Here I am upscaling to x1 by default. Just use any upscaler, which goes in:
\ComfyUI\models\upscale_models
NOTE: The math is: multiplier of the upscaler x scale_by factor.
So, if you are using a x4 upscaler, that x4 will be applied automatically, so you need to multiply that number by the factor you want to get the final scaling factor.
Default: 4 x 0.25 = 1 (no upscaling)
=================================================
Inpainting:
1. Press "choose file to upload" and choose the image you want to inpaint.
2. Right-Click on the image and select "Open in Mask Editor". There, you'll be able to paint the mask.
3. When you are done with the inpainting, press "Save to Node".
=================================================
Outpainting:
Not 100% super duper, but you can get some decent results by extending by up to 256 pixels per side. You might need a bit of RNG though.
=================================================
SDXL to FLUX
This Workflow allows you to
generate images with SDXL or Pony XL + LORAs
Automatically send the resulting image for img2img to FLUX.
FLUX DEV Hi-Res Fix, Img2img, In- & Out- paint, Wildcards, LORAs, Upscaler
🔴High-res Fix 1.3 LITE
Model Details
- Type
- Generic Asset
- Subtype
- Workflows
- Created
- Updated
- July 18, 2026